Repetrel
This page describes and explains the Repetrel software. To download and install the software, please see the [downloads page].
Repetrel is the name of our proprietary software which runs our equipment. It is based on an older, publicly available version of Repetier Host.
Versions
Repetrel version 2.555 was released in August, 2015, and is available [here].
Repetrel version 2.482 was released in July, 2015.
Repetrel version 1.85 was released in September, 2014.
Repetrel version 1.6 was released in July, 2014.
Repetrel version A33 was released in 2013.
Interface
The Repetrel interface is divided into three main sections: the Top Menu Area, the Left Side Area, and the Right Side Area:


These are explained in detail in the subsequent sections:
Top Menu Area
The content of the Top Menu Area is constant and always visible, and has the following buttons/menus:
![]()
File

The File menu (shown to the right) has the following options:
- Open Project will open a HyProj (Hyrel Project) on a blank build area, including multiple elements as scaled/rotated/positioned.
- Add Project will add another HyProj to the current build area.
- Save Project will save all elements as displayed as a HyProj.
- Save Project As will save the HyProj as displayed with a name and location of your choosing.
- Save As has the following submenu options:
- STL will save your currently selected STL file with a name and location of your choosing.
- Gcode will save your currently selected Gcode file with a name and location of your choosing.
- Job will save your...
- Import has the following submenu options:
- Slic3r has the following submenu options:
- All Recipes will import All of our Slic3r recipes into their default locations, overwriting anything with the same names.
- All Print Recipes will import our Print recipes into their default locations, overwriting anything with the same names.
- All Printer Recipes will import our Printer recipes into their default locations, overwriting anything with the same names.
- All Filament Recipes will import our Filament recipes into their default locations, overwriting anything with the same names.
- STEP IGES FILE will allow you to designate a single STEP or IGES file to be loaded to be processed to generate gcode.
- FLATCAM FILE will allow you to designate a single Flatcam file to be loaded to be processed to generate gcode.
- Slic3r has the following submenu options:
- Export will...
- Zip and Send To USB has the following submenu options:
- REPETREL will...
- SLIC3R will...
- Slic3r Recipes will...
- Screen Shot will...
- Project with Source Files will...
- Screen Shot To Project Folder will...
- Project Gcode will...
- Email has the following submenu options:
- Slic3r Settings will...
- Project will...
- Contact Manager will...
- ScrenShot will ...
- Open Folder Browser has the following submenu options:
- Last Part Gcode Folder will open the directory from which the last gcode file was opened.
- Last Part STL Folder will open the directory from which the last STL file was opened.
- Repetrel/Bin will open the C:\repetrel\bin directory.
- Default Network Location will open your default network location.
- Slic3r Recipes has the following submenu options:
- Print Recipes will open C:\Users\Hyrel\AppData\Roaming\Slic3r\print.
- Printer Recipes will open C:\Users\Hyrel\AppData\Roaming\Slic3r\printer.
- Filament Recipes will open C:\Users\Hyrel\AppData\Roaming\Slic3r\filament.
- Update Firmware has the following submenu options:
- HotHead Controller will launch the application to flash new firmware on your 103 hothead/hotbed controllers.
- 407 Motion Controller will launch the application to flash new firmware on your 407 motion controller.
- Exit will close and exit the Repetrel program.
The Print button will cause the printer to commence executing the first gcode file in your treeview.
Kill job
The Kill job button will cause the printer to cancel the gcode currently running.
Functions
The Functions menu (shown to the right) has the following options:

- Manual Control will bring the Control Tab to the foreground of the Left Side Area.
- UNLOCK MOTORS will disengage (unlock) the motors controlling X, Y and Z positioning, allowing for manual movement.
- Home XY Motors will send the following commands:
- G28 X0 Y0 - this sends the X and Y to the home position;
- G92 X0 Y0 - this resets the home location to the current position; and
- G0 X0 Y0 - this tells the X and Y to move to the home position (where they already are).
- Home Z Axis does nothing at present.
- Send Z to Zero... will send a G0 Z0 command, sending the bed and/or yoke in the Z axis to the programmed Z position.
- M7 Turn on AUX OUTPUT will send an immediate M7 command to energize the Aux Output 1 connection.
- M8 Turn On Aux Output 2 will send an immediate M8 command to energize the Aux Output 2 connection.
- M9 Turn OFF Aux OUTPUTS will send an immediate M9 command to de-energize both Aux Output connections.
Light
The Light menu (shown to the right) has the following options:

- Turn Light On will send two commands:
- M672 S0, diabling any sensor=based triggering (see below), and then
- M670 S100 command, turning on the X-Arm light.
- Turn Light Off will send an M670 S0 command, turning off the X-Arm light.
- X Axis Home Sensor will send an M672 S1 command, so the the X-Arm light toggles when the X Home sensor is tripped.
- Y Axis Home Sensor will send an M672 S2 command, so the the X-Arm light toggles when the Y Home sensor is tripped.
- Z Axis Home Sensor will send an M672 S3 command, so the the X-Arm light toggles when the Z Home sensor is tripped.
- W Axis Home Sensor will send an M672 S4 command, so the the X-Arm light toggles when the W Home sensor is tripped. As of August, 2016, there is NO W Axis or W Axis sensor on any production model.
- X Axis Stall Sensor will send an M672 S5 command, so the the X-Arm light toggles when the X Stall sensor is tripped.
- Y Axis Stall Sensor will send an M672 S6 command, so the the X-Arm light toggles when the X Stall sensor is tripped.
- Z Axis Stall Sensor will send an M672 S7 command, so the the X-Arm light toggles when the X Stall sensor is tripped.
- W Axis Stall Sensor will send an M672 S8 command, so the the X-Arm light toggles when the X Stall sensor is tripped. As of August, 2016, there is NO W Axis or W Axis sensor on any production model.
- M7 Output Status will...
- Turn Off Scanner Grid Light will send an immediate M671 S0, which has no effect on current production models.
- Turn On Scanner Grid Light will send an immediate M671 S255, which has no effect on current production models.
- Run Scan Motor has no effect on current production models.
- Stop Scan Motor has no effect on current production models.
Settings
The Settings menu (shown to the right) has the following options:

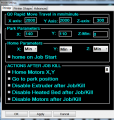
- Printer will launch the Printer Settings configuration tool, which has three tabs:
- Printer allows for configuration of G0 Rapid Movement Rates, Park parameters, Home Parameters, and Actions after Job Kill.
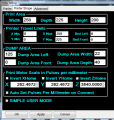
- Printer Shape allows for configuration of Print Area, Travel Limits, Dump Area, and Custom Pulses per Milimeter settings in each axis. Most users should NEVER change these settings.
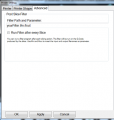
- Advanced has options for post-slicing filters.
Printer
Printer Shape
Advanced


Help
The Settings menu (shown to the right) has the following options:
- asdf will send two commands:
Power Indicator, Clock
The Settings menu (shown to the right) has the following options:
- asdf will send two commands:
ALARM
The Settings menu (shown to the right) has the following options:
- asdf will send two commands:
RESET
The Settings menu (shown to the right) has the following options:
- asdf will send two commands:
Left Side Area
The content of the Left Side Area is dynamic, changing depending on which of the Left Side Tabs you have selected:
Right Side Area
The content of the Right Side Area is dynamic, changing depending on which of the Right Side Tabs you have selected: