Flow Rate
M221 Note!
This page describes our native Hyrel flow calculations. If you are using M229 E1 D1 to opt in to using the E values produced by the slicer, IGNORE THE FLOW CALCULATIONS ON THIS PAGE.
Also note, ONLY v4.x and later will use E-values. v1.x, v2.x, and v3.x will ONLY use the information below.
If you are using one of the following:
- M229 E0 D0
- No mention of M229
- Version 3.x or earlier
...then the info below is accurate for your printing.
If you ARE using M229 E1 D1, then the printer will flow according to the E values in your gcode, and NOT use the formulas below.
Either way, the PRIME and UNPRIME numbers are still used; we do NOT use gcode-based retraction.
Overview
We often get asked how we calculate our flow rate.
We do not use your slicer-generated E (flow) values or advance/retract commands. This means we do not use your slicer-generated extrusion width variations, filament width variations, flow rate multipliers, or any of that.
What do we use? We use the X/Y/Z positioning and speed, and we use the temperature and cooling. We do not use your flow commands - except to determine which are and are not printing moves.
We calculate the flow rate for each and every move based on the following parameters:
- Nozzle (extrusion) width, as specified on the head (or, optionally, in gcode); should match the extrusion width in your recipe and gcode.
- Layer thickness (height), as specified in your gcode. Width times Height tells us the Cross Section of your print path.
- Print speed, as specified in your gcode. Volume divided by print speed tells us how many nl per second to dispense.
- Pulses/nl, as specified on the head (or, optionally, in gcode). Pulses/nl times nl/second tells us how many pulses per second to dispense.
- Material Flow Rate Multiplier, as specified on the head (or, optionally, in gcode). Material Flow Rate Multiplier is a direct modifier of your other calculations; 1.00 = no modification; 0.90 means 10% less flow, etc.
Note: Versions 1.x and 2.x used pulses per ~10 nanoliters (nl). Version 3.x uses pules per microliter (μl).
| To determine flow we consider: 1. Path Width, as specified in the nozzle diameter paramenter on the data for that print head (NOT path width in the slicer) [unless you manually hard code a value in your gcode]; |
We also determine when we are transitioning between printing and non-printing moves, and prime (advance) and unprime (retract) per the variables stored on your print head (or as you have manually specified in your gcode).
GCode
So, how can you specify this in GCode?
One of the things that a slicer does is generate extrusion values along with the moves, so that printers know how much material to deploy (or not to deploy any) during a move. For example:
G1 X107.310 Y122.630 E1.45876
This line tells the printer to do a normal speed move from the present location to position X=107.310 and Y=122.630 while extruding a certain amount E1.45876 of material. However, on Hyrel machines, the material feed rate is calculated from the data stored on the print head, and is not taken directly from the gcode.
We do a simple boolean check on the G1 move to determine if it is a printing move or not (if it has an E value or not), and we calculate our own flow based on path width, layer height, pulses per 10 nanoliters and the FR Scale which are stored in the head data. We also calculate our own prime/unprime settings based on the data displayed and stored on the print head.
The default setting for the EMO-25 is 1.76 pulses/nl and 1.0 feed rate. In gcode, this is:
M221 S1 P1.76 T12
This tells the printer to do a Set tool values of Material Flow Rate Multiplier (formerly called Feed Rate Adjustment or "fudge factor") S1 times Pulses per 10 nanoliters P1.76 for the Tool at Yoke 1, Position 2 T12.
This is sourced in as a default when you start the job, but can be changed programmatically in the gcode as follows:
 G1 F1200            ; set print speed to 1200 mm/min (20 mm/sec)
 G1 X10 Y10 Z0.25    ; move to start of line 1
 M221 S1 P1.76 T12   ; set extrusion rate to 1*1.76 on yoke 1, tool 2 (base value)
 G1 X60 Y10 E1       ; 1st printing move
 G1 X10 Y20          ; move to start of line 2
 M221 S1.1 P1.76 T12 ; set extrusion rate to 1.1*1.76 on yoke 1, tool 2 (10% greater than line 1)
 G1 X60 Y20 E1       ; 2nd printing move
 G1 X10 Y30          ; move to start of line 3
 M221 S1.2 P1.76 T12 ; set extrusion rate to 1.2*1.76 on yoke 1, tool 2 (20% greater than line 1)
 G1 X60 Y30 E1       ; 3rd printing move
To give this more depth, here is exactly how we calculate the flow rate.
At the start of a job (when you click "Run Job"), Repetrel transmits settings via gcode commands to the STM407 Motion Controller, based on the data you have displayed for that print head. For our example, I have a MK1 head loaded in slot 2:
 M6 T12 O2 X0 Y0 Z0
 M721 S10000 E300 P80 T12
 M722 S10000 E300 P105 T12
 M221 S1.0 T12 P0.80 W0.5 Z0.3
Let's break this down:
M6 T12 O2 X0 Y0 Z0 - sets the offsets for tool 2 (normally zero unless you have heads cooperating on a print, but you could program them for their distance from center; T2 is centered on newer printers, and 35mm off center in the +X direction on older printers. On all printers, T3 35mm off center in the -X, T1 is 70mm +X, T4 is 70mm -X.
M721 S10000 E300 P80 T12 - sets the UNPRIME values, in rate (S), min dwell time (E), and pulses (P) for slot 2 (T)
M722 S10000 E300 P105 T12 - sets the PRIME values as above;
M221 S1.0 T12 P0.80 W0.5 Z0.3 - sets up your flow data: S1.0 = adjustment value of 1.0 (100% of the pulses per 10 nanoliters) T12 = tool at yoke 1, slot 2 P0.80 = pulses per 10 nanoliters W0.5 = extrusion width Z0.3 = Z layer thickness
Now, any or all of these variables may be updated with a new value by a subsequent M221 command; all values are persistent unless/until updated to a new (possibly 0) value later on in the code - or by adjusting the S or P values live on the print head.
Immediate Commands
While M721 S10000 E300 P105 T12 will set up the prime values for the print head, it will not cause these values to be executed.
M721 I1 will cause that print head last addressed (or M721 T12 I1 if you want to specify) to perform the unprime at this point in the code, with the values previously stored for that head.
Likewise, M722 I1 will cause the print head to do a prime.
Initial Numbers
So, sometimes people ask us where we get our numbers for pulses per microliter, and prime, and unprime.
Flow
First, we determine the flow. M221 is detailed at http://hyrel3d.net/wiki/index.php?title=Gcode#M221_Set_Flow_Rate but I will reproduce this here:
M221 sends information to the printer about material flow:
- P is the number of pulses on the motor to dispense 10 nl of material;
- S is the direct flow multiplier (to allow for undersized or oversized stock;
- W is the width of the cross section of the volume to fill;
- Z is the height (layer thickness) of the cross section of the volume to fill; and
- T is the tool (head) to which these values will be applied.
Here is an example:
M221 S1.0 T11 P77 W0.5 Z0.3
These commands are decoded and executed by the printer as follows:
- M221 (Set Flow Rate)
- S1.0 (flow multiplier of 1.0)
- T11 (for far left head)
- P77 (77 pulses per microliter)
- W0.5 (0.5mm nozzle)
- Z0.3 (0.3mm layer thickness) - note that your gcode M756 will overwrite this value)
This can be as simple as setting the Z-zero and printing a "digital snake" like this - a series of long lines at a constant speed (without headers and footers), using slot 2 (T1):
 T1
 G0 X50 Y50
 G1 X150 Y50 E1 F2000
 G1 X150 Y60 E1
 G1 X50 Y60 E1
 G1 X50 Y70 E1
 G1 X150 Y70 E1
 G1 X150 Y80 E1
 G1 X50 Y80 E1
 G1 X50 Y90 E1
 G1 X150 Y90 E1
So, that's fine if everything's perfect. But let's say your pulses per microliter were set to 80, but you are not putting out enough material. We would change the flow parameters with each line, like this:
 T1
 G0 X50 Y50
 M221 T12 P81 ; 81 pulses
 G1 X150 Y50 E1 F2000
 G1 X150 Y60 E1
 M221 T12 P82 ; 82 pulses
 G1 X50 Y60 E1
 G1 X50 Y70 E1
 M221 T12 P83 ; 83 pulses
 G1 X150 Y70 E1
 G1 X150 Y80 E1
 M221 T12 P84 ; 84 pulses
 G1 X50 Y80 E1
 G1 X50 Y90 E1
 M221 T12 P85 ; 85 pulses
 G1 X150 Y90 E1
Now, we'll inspect these lines, and let's say the lines printed with 83 pulses was very good, but we want it to be even better; we'd do this:
 T1
 G0 X50 Y50
 M221 T12 P82.4 ; 82.4 pulses
 G1 X150 Y50 E1 F2000
 G1 X150 Y60 E1
 M221 T12 P82.6 ; 82.6 pulses
 G1 X50 Y60 E1
 G1 X50 Y70 E1
 M221 T12 P82.8 ; 82.8 pulses
 G1 X150 Y70 E1
 G1 X150 Y80 E1
 M221 T12 P83 ; 83 pulses
 G1 X50 Y80 E1
 G1 X50 Y90 E1
 M221 T12 P83.2 ; 83.2 pulses
 G1 X150 Y90 E1
Now, we inspect these again, and decide that 82.8 pulses is our number. Or, we can repeat this with smaller increments until we get the number that works best. Then we'll test it on actual prints.
When we're happy with the flow number, we'll move on to the Unprime...
Unprime
Now we need to dial in the UNPRIME.
PLEASE NOTE that our firmware will automatically execute the current UNPRIME values ONE TIME when we detect that your head is changing from an extruding state to a non-extruding state.
M721 is detailed at http://hyrel3d.net/wiki/index.php?title=Gcode#M721_Set_Unprime_Values but I will reproduce it here:
M721 sends information to the printer about how much material to unprime when a transition from printing move to non-printing move is detected:
- S is the speed at which unprime moves should be executed; this is normally 10,000;
- E is the number of pulses on the feed (extrusion) motor to execute; this varies greatly among materials;
- P is the number of milliseconds to pause before enabling the flow rate for the following move;
- T is the tool (head) to which these values will be applied; and
- I is the flag for executing an Immediate action; so M721 I1 would execute an unprime with the previously specified values at that point in the gcode.
Here is an example:
M721 S10000 E100 P-15 T11
These commands are decoded and executed by the printer as follows:
- M721 (Set Unprime Values)
- S10000 (10,000 pps)
- E100 (100 pulses)
- P-15 (15ms before end of print move sequence)
I normally take the same digital snake from above, but I make the short moves non-printing by removing the E1:
 T1
 G0 X50 Y50
 G1 X150 Y50 E1 F2000
 G1 X150 Y60
 G1 X50 Y60 E1
 G1 X50 Y70
 G1 X150 Y70 E1
 G1 X150 Y80
 G1 X50 Y80 E1
 G1 X50 Y90
 G1 X150 Y90 E1
If the unprimes are good, we're done. If not, I change the values for each printing move. For example, if the unprime pulese were 100, and this was not enough, I'll change ONLY the pulses:
 T1
 G0 X50 Y50
 M721 T12 E100 ; unprime 100 pulses
 G1 X150 Y50 E1 F2000
 M721 T12 E120 ; unprime 120 pulses
 G1 X150 Y60
 G1 X50 Y60 E1
 M721 T12 E140 ; unprime 140 pulses
 G1 X50 Y70
 G1 X150 Y70 E1
 M721 T12 E160 ; unprime 160 pulses
 G1 X150 Y80
 G1 X50 Y80 E1
 M721 T12 E180 ; unprime 180 pulses
 G1 X50 Y90
 G1 X150 Y90 E1
Using the same logic as above, I'll dial in the proper number of pulses for the unprime - and this number should be the same for the prime, below.
Since we always leave the prime/unprime rate at 10,000, next we'll dial in the dwell time. For filament heads this is usually between 20 and 35msec, but for reservoir prints, it's usually much larger. I like to use 1/10 of the number of pulses; so, if my unprime is 4000 pulses, I'll set the delay to 400msec for reservoir heads.
Prime
Lastly, we dial in the PRIME.
PLEASE NOTE that our firmware will automatically execute the current PRIME values ONE TIME when we detect that your head is changing from a non-extruding state to an extruding state.
M722 is detailed at http://hyrel3d.net/wiki/index.php?title=Gcode#M722_Set_Prime_Values but I'll reproduce it here:
M722 sends information to the printer about how much material to prime when a transition from non-printing move to printing move is detected:
- S is the speed at which prime moves should be executed; this is normally 10,000;
- E is the number of pulses on the feed (extrusion) motor to execute; this varies greatly among materials;
- P is the number of milliseconds to pause before enabling the flow rate for the following move;
- T is the tool (head) to which these values will be applied; and
- I is the flag for executing an Immediate action; so M721 I1 would execute a prime with the previously specified values at that point in the gcode.
Here is an example:
M722 S10000 E100 P20 T11
These commands are decoded and executed by the printer as follows:
- M722 (Set Prime Values)
- S10000 (10,000 pps)
- E100 (100 pulses)
- P20 (20ms before start of print move sequence)
- T11 (for far left head)
Next, I'll set the primes to the same values as the unprimes (except for positive dwell time, unlike the negative dwell for unprimes). If that works, great! If not, we'll need to tune it up...
We'll use the same gcode for the primes, but we'll set the prime values instead:
 T1
 G0 X50 Y50
 M7212 T12 E100 ; prime 100 pulses
 G1 X150 Y50 E1 F2000
 M722 T12 E120 ; prime 120 pulses
 G1 X150 Y60
 G1 X50 Y60 E1
 M722 T12 E140 ; prime 140 pulses
 G1 X50 Y70
 G1 X150 Y70 E1
 M722 T12 E160 ; prime 160 pulses
 G1 X150 Y80
 G1 X50 Y80 E1
 M722 T12 E180 ; prime 180 pulses
 G1 X50 Y90
 G1 X150 Y90 E1
Next, using the same logic and methodology as before, we'll adjust, print, and observe until we get these final numbers set to our satisfaction.
Dispensing a Specific Amount
Because sometimes folks just want to dispense a set number of microliters.
Remember, the links on the left can take you to frequently-sought pages.
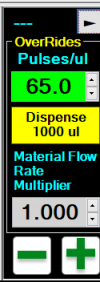
Dispense 1000 uL
To dispense 1,000 uL, you can press the "Dispense 1000 ul" button on the OverRides page:
But if that's not working... read on.
Prime (some) uL
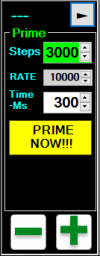
Another option: you can read the Pulses/ul value (in this case, 65) and put it times (however many uL you want) in the Steps field of the Prime page (where 3000 is shown here) and then click "PRIME NOW!!!":
M722 (Prime)
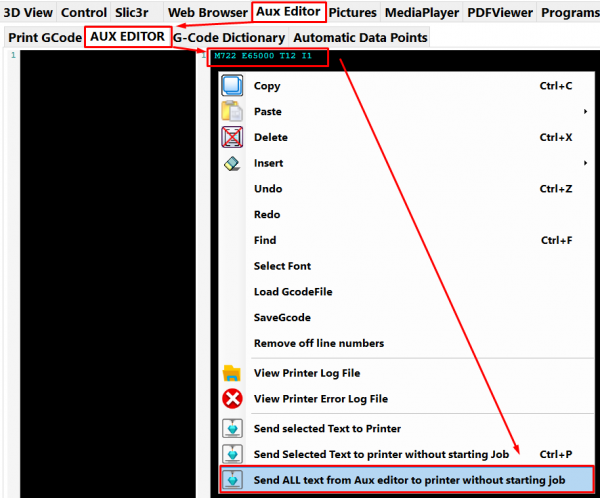
Another option: you can get your values like above, but go to the Aux Editor > AUX EDITOR tab and type the M722 (Prime) command in: M722 E65000 T12 I1 and then execute it with a right click:
For more about this command, see Gcode#M722_Set_Prime_Values
M723 (Manual Extrusion)
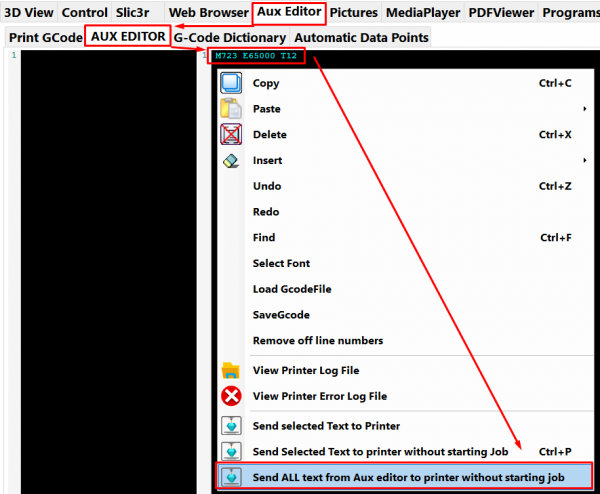
Another option: you can get your values like above, but go to the Aux Editor > AUX EDITOR tab and type the M723 (Manual Extrusion) command in: M723 E65000 T12 and then execute it with a right click:
For more about this command, see Gcode#M723_Set_Manual_Flow


